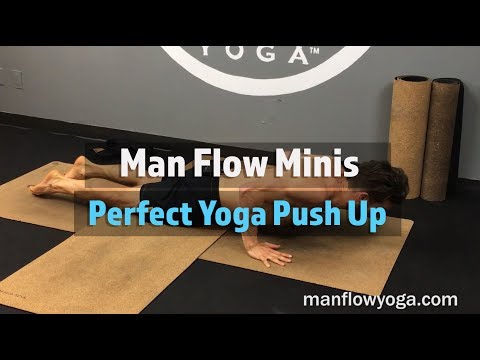
Yoga Push Up Overview
The yoga push up flows from one pose into a push up. You start in a downward dog with your hips high. Then you move into a low push up and back. This works your chest, the muscles on the front of your ribs. It also works your shoulders, triceps, and abs. You need no equipment. The yoga push up builds pushing strength and body control. The flowing motion also stretches your shoulders and back. It is a nice pick for people who like smooth, flowing moves. You can do it anywhere with floor space. Add the yoga push up to a push day or a warm-up. Move slow and breathe with each part.
What Is The Point of the Yoga Push Up?
The yoga push up exercise combines strength training with flexibility work. It builds chest power while improving your flow between poses.
How To Do The Yoga Push Up
- Start in downward dog with your hands planted firmly on the floor, hips pushed up and back, and your body forming an upside-down V. Spread your fingers and grip the ground.
- Set your feet about hip-width apart and press your heels toward the floor. Pull your shoulders away from your ears and brace your core.
- Shift your weight forward, lowering your hips and moving into a straight plank position. Keep your body in one line from head to heels and your abs tight.
- Take a breath and brace as you reach plank. Your shoulders should be over your hands and your whole body rigid.
- Lower down into a chaturanga by bending your elbows and keeping them tucked close to your ribs. Descend under control until your upper arms are about parallel to the floor.
- Keep your body straight and your elbows hugging your sides as you lower. Do not let your hips sag or your elbows flare out wide.
- Press back up to plank by driving through your palms and straightening your arms, thinking about squeezing your chest and triceps.
- From plank, push your hips up and back to flow smoothly into downward dog again. This return completes one full cycle and gives your shoulders a brief stretch.
- Move with your breath, flowing between the positions with control. Intermediate lifters do well with 3 sets of 8 to 12 smooth cycles.
Yoga Push Up Form Tips
- Keep your hands flat and under your shoulders in plank.
- Move slow and smooth between each pose.
- Keep your elbows close to your ribs as you lower.
- Keep your body in a straight line during the push up.
- Push your hips high in the downward dog.
- Tighten your core through the whole flow.
- Keep your neck long. Do not crane it up.
- Breathe in as you lower. Breathe out as you press.
- Press your heels down in the down dog for a stretch.
Common Mistakes to Avoid for the Yoga Push Up
- Flaring your elbows out in the chaturanga. Letting the elbows wing out puts hard stress on the front of the shoulder and weakens the press. Keep your elbows tucked close to your ribs as you lower toward parallel.
- Letting your hips sag in the plank and lowering phase. A sagging middle strains your lower back and breaks the straight-line tension. Squeeze your glutes and brace your abs so your body stays one rigid line.
- Dropping too low in the chaturanga. Sinking your chest all the way to the floor overstretches the shoulder and makes pressing back up much harder. Stop when your upper arms are about parallel to the ground.
- Rushing the flow and losing control. Speeding through the transitions turns a controlled sequence into a flop and takes the muscles out of it. Move deliberately and stay connected to your breath.
- Skipping the full downward dog position. Cutting the hips-up phase short robs you of the shoulder stretch and the smooth flow. Push your hips up and back fully to complete each cycle.
- Shrugging your shoulders up to your ears. Rising shoulders in plank or dog mean the traps are straining and your base is unstable. Pull your shoulders down and keep them packed throughout.
- Letting your lower back round in downward dog. Forcing the pose with bent knees and a rounded back changes the stretch and stresses the spine. Push your chest toward your thighs and keep your back long, bending your knees slightly if your hamstrings are tight.
- Bending your elbows before your body reaches plank. Starting to lower before you are in a straight line jumbles the movement and loads the shoulders awkwardly. Reach a solid plank first, then begin the chaturanga.
- Craning your neck to look forward. Dropping your head back stresses the neck and throws off your alignment. Keep your neck long and your gaze down toward the floor.
- Doing partial reps once you fatigue. Grinding shallow half reps when you tire trains you to stop short and cheats the muscles. When full cycles break down, rest or drop to your knees.
- Holding your breath through the sequence. Yoga push ups are meant to flow with your breathing, and holding your air leaves you tense and lightheaded. Breathe steadily through each phase.
Yoga Push Up Workout Tips
- Learn the downward dog and plank positions on their own first. Getting comfortable in each pose makes the flow between them smooth and controlled once you link them.
- Keep your elbows tucked in the chaturanga. Elbows hugging your ribs protect the shoulders and keep the chest and triceps doing the pressing work.
- Move with your breath. Flowing between the positions in time with your breathing keeps the tempo controlled and adds a mobility and mind-body element to the strength work.
- Chase the mind-muscle connection with your chest and triceps in the lowering phase. Feel those muscles control your descent and press you back to plank.
- Use a controlled eccentric into the chaturanga. Lowering slowly keeps tension on the chest and triceps and builds more strength than dropping fast.
- This movement blends pressing strength with shoulder and hamstring mobility. That makes it a great warm-up, a conditioning finisher, or a standalone flow on a lighter day.
- Program it in a bodyweight circuit or as active recovery. The mix of strength and stretch makes it useful on days you want to move without heavy loading.
- Keep the reps controlled, around 8 to 12 cycles for 3 sets. Quality of movement matters more than raw numbers here.
- Regress by dropping to your knees for the chaturanga portion. Keeping the press clean matters more than doing every rep on your toes.
- Progress by pausing in the chaturanga or slowing the whole flow. More time under tension raises the difficulty without any equipment.
- Use the downward dog phase to stretch your shoulders and hamstrings. Pressing your chest toward your thighs and your heels toward the floor opens up tight areas.
- Keep your core braced through every position. A tight trunk protects your lower back and keeps the flow smooth rather than saggy.
- The flow is easy on the joints compared to heavy pressing. That makes it a smart option when you want to train your chest and triceps without loading a cranky shoulder.
- Film yourself from the side. The camera reveals hip sag, elbow flare, and rushed transitions that you cannot feel while moving.
- Do these anywhere with zero equipment. They are perfect for travel, home workouts, or warming up before heavier lifts.
- Do not sacrifice control to speed through reps. A few smooth, controlled cycles beat many rushed ones, so slow down and own each position.
- Stay consistent to build both strength and mobility. Combining the two in one movement pays off across all your training, so keep it in your rotation.








Questions & Comments
Be the first to ask a question about this exercise.