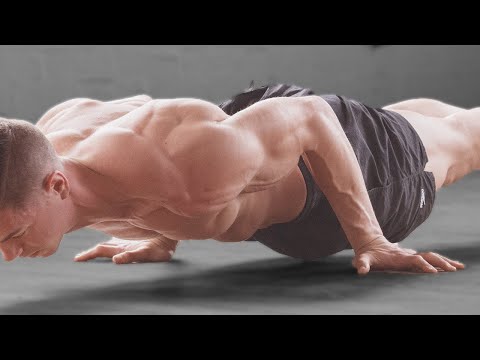
1 Leg Pushup Overview
The 1 leg pushup is a hard chest move. It works your chest the most. Your triceps, shoulders, and abs help too. The triceps are the back of your arms. You need no equipment. You just use your body and the floor. You do a push up with one leg lifted off the ground. This makes your core work much harder to stay steady. Your chest still does the main pushing. Lifting one leg also tests your balance. It is an advanced move. You should master normal push ups first. Add the 1 leg pushup on push days or at home when you want a challenge.
What Is The Point of the 1 Leg Pushup?
The 1 leg pushup builds serious upper body strength and core stability. It's way harder than regular pushups and shows real strength.
How To Do The 1 Leg Pushup
- Start in a standard plank or push up position with your hands about shoulder width apart and your body in a straight line from head to heels. Spread your fingers and grip the floor.
- Set your shoulders down and away from your ears and brace your core hard. Squeeze your glutes so your hips stay level with your shoulders.
- Lift one leg a few inches off the ground and keep it straight throughout the movement. Taking a leg away shrinks your base and forces your core to fight rotation.
- Keep your hips square and level as you hold the leg up. Do not let the raised-leg side sag or your hips twist toward the floor.
- Take a breath, brace, and lower your chest toward the floor under control, letting your elbows tuck to about 45 degrees rather than flaring wide. Aim for a two to three second descent.
- Lower until your chest is just above or lightly touching the floor while keeping your single-leg position rock solid. Keep your hips level the whole way down.
- Press back up through your chest and triceps, driving the floor away and keeping the raised leg straight and lifted. Fight any urge for your hips to twist.
- Keep your core braced and your body rigid so you resist the rotational pull of standing on one leg. That anti-rotation demand is a big part of the challenge.
- Finish all your reps with one leg raised, then switch legs and repeat to balance both sides. This is an advanced move, so 6 to 10 controlled reps per side for 3 sets is plenty.
1 Leg Pushup Form Tips
- Keep your body straight from head to heels.
- Keep your lifted leg straight and up.
- Brace your belly so your hips do not sag.
- Keep your hips level. Do not twist.
- Lower slowly. Stay in control.
- Push through your chest and triceps.
- Keep your neck in line with your back.
- Keep your elbows tucked, not flared wide.
- Breathe out as you push up.
Common Mistakes to Avoid for the 1 Leg Pushup
- Letting your hips twist toward the floor. With one leg raised, your body constantly wants to rotate, and giving in strains your lower back and shoulders. Brace your core hard and keep your hips square through every rep.
- Letting your hips sag or the raised-leg side drop. A drooping midsection means your core has lost tension, which strains your back and cheats the drill. Squeeze your glutes and keep a straight line from head to heels.
- Flaring your elbows straight out to the sides. A 90 degree flare stresses the shoulder joint and weakens your press. Keep your elbows tucked to around 45 degrees so the load stays on your chest and triceps.
- Rushing through the reps to stay balanced. Moving fast to power past the instability uses momentum and hides poor control. Slow down, own the lowering phase, and keep your leg steady and lifted.
- Cutting the range of motion short. Half push ups that never bring your chest near the floor skip the stretch where the chest works hardest. Lower to a full depth on every rep while keeping your hips level.
- Dropping the raised leg partway through the set. Letting the leg touch down between reps resets the stability challenge and defeats the point. Keep the leg straight and lifted for the entire set on that side.
- Losing your shoulder set as you fatigue. When your shoulders shrug up toward your ears, the joint is exposed and less stable. Keep your shoulders down and back and your upper back tight.
- Attempting it before you own solid standard push ups. Removing a leg adds a real anti-rotation and balance challenge that will crush a weak push up. Build a strong regular push up first, then progress.
- Holding your breath through the reps. A locked breath weakens your brace on a drill that already demands total-body and anti-rotation tension. Breathe steadily and keep your core rigid.
- Doing uneven work between sides. Favoring your stronger side deepens an imbalance on an already lopsided drill. Match your reps and effort with each leg raised.
- Letting your head drop or crane forward. Dropping your head drags your upper back out of line and shifts your weight forward. Keep your neck neutral so your spine stays straight.
1 Leg Pushup Workout Tips
- Master standard push ups before you try this one. Lifting a leg adds a serious anti-rotation and balance challenge, so build a strong regular push up base first.
- Brace your core like you are resisting a twist. Standing on one leg constantly tries to rotate you, so a hard brace is what keeps your hips square and your shoulders safe.
- Keep your hips level and square throughout. Fighting the rotation is a big part of the value here, training your core to resist twisting under load.
- Squeeze your glutes and keep the raised leg straight. An active, lifted leg keeps your body rigid and turns each rep into a full-body effort.
- Keep your elbows around 45 degrees. This protects your shoulders and keeps the load on your chest and triceps where you want it.
- Control the lowering phase for two to three seconds. A slow eccentric on an unstable base builds strong chest and triceps while teaching total-body control.
- Match your reps and effort on both sides. Since one leg is raised, even work keeps you from building a lopsided chest, shoulders, and core.
- Start with just 6 to 10 quality reps per side. The reduced base makes every rep harder, so favor clean control over big numbers.
- Program it as an advanced push variation or core challenge. It fits on push day when you want to build pressing strength and anti-rotation control together.
- Squeeze your chest as you press up. Chasing the mind-muscle connection turns each rep into focused chest work rather than just fighting to stay balanced.
- Progress by adding reps or slowing the tempo. Since it is bodyweight, you overload it with more control and time under tension rather than added weight.
- Keep your shoulders set down and back. A stable shoulder base protects the joint and gives your chest a solid platform to press from.
- Film yourself from the side and front. Video shows hip twist and sag far better than the effort feels while you are grinding.
- Widen your hands slightly to scale it down if needed. A slightly wider base makes the balance easier while you build the strength for the full version.
- Do not train to failure every set. Leaving a rep or two in reserve protects your form on an unstable drill where a collapse could tweak your shoulder.
- Warm up your shoulders, wrists, and core first. A few easier push ups and some bracing work prepare your body for the added instability.








Questions & Comments
Be the first to ask a question about this exercise.