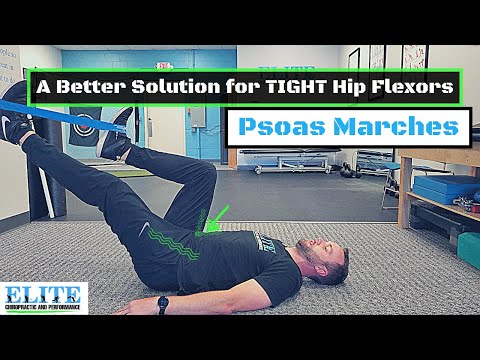
Lying Psoas March Overview
The lying psoas march works your hip flexors. Those are the muscles at the front of your hips. It also uses your abs to keep you steady. You lie on your back with your knees bent. Then you lift one knee toward your chest. You march slowly, one leg at a time. You need no gear. Just your body and the floor. This move is great for beginners. It builds strong, healthy hips. Strong hip flexors help you run, kick, and lift your knees. The lying psoas march also teaches your core to stay tight. That protects your lower back. It fits well in a warm-up. It also works as gentle core work. Move slow and feel each hip work.
What Is The Point of the Lying Psoas March?
The lying psoas march exercise strengthens your hip flexors and core while lying down. It's perfect for building stability and control in your hips without stress on your back.
How To Do The Lying Psoas March
- Lie on your back on a mat with your knees bent at 90 degrees and your feet flat on the floor. Rest your arms at your sides and settle your head down comfortably.
- Set your pelvis first. Gently press your lower back into the floor and draw your belly button toward your spine, creating a light posterior tilt that keeps the abs engaged and the spine safe.
- Take a breath and brace your core so your trunk stays stable while your legs move. This anti-extension control is a big part of what the march trains.
- Slowly lift one knee toward your chest, keeping it bent, while the other foot stays planted and heavy. Move at a controlled pace rather than snapping the knee up.
- Bring the knee to roughly a stacked position over the hip, keeping the shin relaxed. You should feel the hip flexor of the working leg working to hold the leg up.
- Hold that top position for 2 to 3 seconds without letting your lower back arch or your pelvis rock toward the moving leg. This isometric hold is where the psoas earns its keep.
- Lower the foot back to the floor slowly and with control, tapping down lightly rather than dropping. Keep the pelvis flat and steady the whole time.
- Repeat with the other leg in the same deliberate way, alternating like a slow, controlled march.
- Continue for 10 to 16 total reps for 2 to 4 sets, keeping every rep smooth and stopping the moment your lower back starts to lift off the floor.
Lying Psoas March Form Tips
- Keep your lower back pressed into the floor. Do not let it arch.
- Lift with your hip, not your back. Keep your torso still.
- Move slowly both up and down. This move is not a race.
- Keep the resting foot flat and planted. Do not let it slide.
- Hold the top for a couple of seconds. Feel your hip work.
- Keep your belly tight the whole time. This protects your back.
- Breathe out as you lift. Breathe in as you lower.
- Keep your knee bent as you march. Do not straighten the leg.
- Set your foot down soft. Do not drop it hard.
Common Mistakes to Avoid for the Lying Psoas March
- Letting the lower back arch as you lift the leg. When the back lifts, the hip flexors are pulling on the spine and the deep core has switched off, which strains the lumbar area. Keep the light posterior tilt and press your back into the floor for the whole set.
- Rushing the march with fast, jerky reps. Snapping the knee up and dropping it turns a control drill into mindless motion and skips the isometric hold. Slow every rep down and treat the top hold as the main point of the exercise.
- Skipping the hold at the top. The 2 to 3 second pause is where the psoas and deep core really work, so cutting it short wastes the drill. Count the hold out on every rep and keep the pelvis dead still.
- Letting the planted foot slide or the pelvis rock. If the down leg drifts or the hips twist toward the moving leg, you lose the stable base you are trying to build. Keep the planted foot heavy and the pelvis level throughout.
- Holding your breath during the hold. Locking your air makes you rigid and often makes the brace worse, and it leaves you light-headed. Breathe steadily through the hold while keeping the deep core tight.
- Yanking the knee up with a hip-flexor snap. Jerking the leg toward the chest overuses the hip flexors and bypasses the control you want. Lift smoothly and let the pause, not the speed, provide the challenge.
- Flaring the ribs open. When the ribcage splays upward the core disconnects and the back arches. Think about knitting the ribs down toward the hips to keep the trunk locked.
- Lifting the knee too high and losing the tilt. Chasing a big range before you have the control tips the pelvis and arches the back. Only lift as high as you can hold a flat back, then build range over time.
- Tensing the neck and shoulders. Straining up top wastes energy and leaves you sore in the wrong places. Keep the head, neck, and shoulders relaxed on the mat.
- Marching unevenly between legs. Favoring the stronger, more coordinated side builds an imbalance in a joint that already loves to be asymmetrical. Match the height, hold, and speed on both legs.
- Treating it as cardio instead of control. Going fast for a big rep count misses the whole point, which is stability and deep-core strength. Keep it slow, deliberate, and quality over quantity.
Lying Psoas March Workout Tips
- Set the pelvic tilt before every set. Pressing your lower back gently into the floor engages the deep core and keeps the psoas march safe and effective.
- Make the top hold the star of the show. A steady 2 to 3 second pause with the knee lifted is where the hip flexor and core control really build.
- Move slowly and deliberately. This is a control drill, not cardio, so smooth reps beat fast ones every time.
- Keep the planted foot heavy. Anchoring the down leg gives you a stable base and stops the pelvis from rocking side to side.
- Breathe steadily through the hold. Keeping air moving while you brace lets you stay stable without going rigid or light-headed.
- Start with a smaller lift if your back wants to arch. A lower knee with a flat back beats a high knee that lifts your spine off the floor.
- Program it as a warm-up or core-activation drill. It is a great primer before squats, running, or heavy lifting because it wakes up the deep hip and core muscles.
- Aim for 2 to 4 sets of 10 to 16 total reps. Progress by lengthening the hold or adding a light ankle weight rather than just going faster.
- Add a light ankle weight or a mini band once bodyweight feels easy. A small load or band resistance around the thighs raises the challenge without wrecking your control.
- Place a hand under your lower back at first. Feeling your back press onto your fingers gives instant feedback that you are holding the tilt.
- Keep the shin and foot relaxed. A loose lower leg keeps the focus on the hip flexor and deep core rather than gripping with the shin.
- Match both legs carefully. The hips love to work asymmetrically, so equal reps and holds on each side keep you balanced.
- Pair it with dead bugs and planks. Together they build a core that resists your lower back arching, which carries over to nearly every lift.
- Film yourself from the side. A quick video shows exactly when your back lifts or your pelvis rocks, which is hard to feel in the moment.
- Do not chase soreness here. This drill builds control and stability, so judge it by how steady and strong you feel rather than how sore you get.
- Stay consistent over weeks. Deep-core and hip-flexor control is a skill that rewards steady, quality practice more than one hard session.








Questions & Comments
Be the first to ask a question about this exercise.