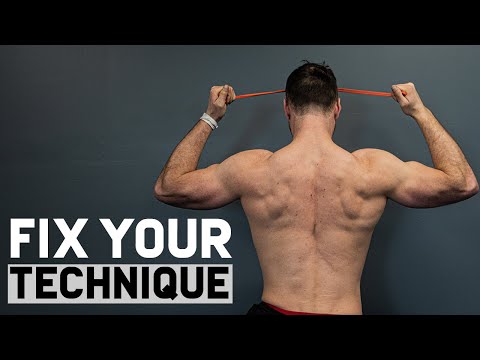
Banded Face Pull Overview
The banded face pull works your middle back. It also hits the small muscles of your rear shoulders. You anchor a resistance band at chest height. Then you pull the handles toward your face. Your elbows lead high and wide. You only need a resistance band. The banded face pull is great for your posture. It pulls your shoulders back and strengthens your upper back. It helps balance out all the pushing you do. It is easy on your joints and good for beginners. Do it for higher reps at the end of a workout. It keeps your shoulders healthy and strong.
What Is The Point of the Banded Face Pull?
The banded face pull exercise targets your middle back and rear deltoids. It fixes forward head posture and builds upper back strength for better posture.
How To Do The Banded Face Pull
- Anchor a resistance band at about chest to face height on a rack, a pole, or a door anchor. Grab a handle in each hand or take the band itself with both hands, palms facing down.
- Step back until the band pulls tight with your arms extended straight out in front of you. Set your feet shoulder-width apart with a slight bend in your knees for a stable base.
- Pull your shoulder blades down away from your ears and lift your chest tall. Take a breath and brace your core so your torso does not lean back to help.
- Pull the band toward your face by leading with your elbows, driving them high and out to the sides. Think about pulling your hands apart as they come toward you.
- As the band nears your face, aim your hands toward your ears or just above so your elbows finish high and wide. Squeeze your shoulder blades together hard at the end.
- Feel the contraction across your upper back and rear shoulders. Your knuckles should end up near the sides of your head with your elbows level with or above your shoulders.
- Hold the peak squeeze for a beat. This end-range contraction is exactly what the exercise is for, so do not rush past it.
- Slowly return your arms to the extended starting position, taking two to three seconds and controlling the band the whole way rather than letting it snap back.
- Keep your shoulders down and your torso still, then start the next rep. Beginners do well with 3 sets of 15 to 20 reps since this is a high-rep, control-focused move.
Banded Face Pull Form Tips
- Keep your elbows high and wide as you pull.
- Squeeze your shoulder blades together at the back.
- Stand tall. Do not lean back to pull.
- Pull your hands apart toward your ears.
- Keep your core tight and steady.
- Pull with control. Do not let the band snap you forward.
- Return slow. Fight the band on the way back.
- Keep your shoulders down, not shrugged up.
- Breathe out as you pull. Breathe in as you return.
Common Mistakes to Avoid for the Banded Face Pull
- Turning it into a low row to your chest. When you pull the band to your sternum with low elbows you hit your lats instead of the upper back and rear delts this move targets. Keep your elbows high and pull toward your face so the right muscles do the work.
- Letting the band snap you back on the return. The band pulls hardest at full contraction, and the easy move is to let it fling your arms back. Control the return over two to three seconds to keep tension on your upper back the whole rep.
- Leaning back to yank the band with your body. Rocking your torso back to muscle a heavier band takes the rear delts and mid-back out of the work. Stay tall and braced, and if you have to lean, the band is too heavy.
- Not squeezing the shoulder blades together. Skipping the scapular squeeze means you miss the whole point of building upper-back health and posture. Pinch your blades together hard at the end of every rep.
- Using a band that is far too heavy. Too much tension forces your elbows to drop and your body to swing just to complete the rep. Pick a lighter band that lets you keep high elbows and a clean squeeze for all your reps.
- Shrugging your shoulders up to your ears. Rising traps mean the upper traps are taking over from the rear delts and mid-back. Keep your shoulders pulled down and think about only the blades pinching.
- Letting your elbows drop below shoulder height. Low elbows shift the pull into a row and skip the rear delts. Drive your elbows high and wide so they finish level with or above your shoulders.
- Cutting the range short at the front. Not letting your arms fully extend at the start means you skip the loaded stretch and shorten the movement. Reach all the way out on the return so each rep covers the full path.
- Rushing through reps with no control. Blasting fast reps uses momentum and defeats the postural purpose of the exercise. Slow down and make every rep deliberate, especially the squeeze and the return.
- Anchoring the band too low. A low anchor turns the pull into an upward row and changes which muscles fire. Set the anchor around chest to face height so the pull comes in level.
- Holding your breath through the set. Locking your air down every rep leaves you lightheaded on a high-rep move like this. Exhale as you pull and inhale as you return.
Banded Face Pull Workout Tips
- Treat this as a posture and shoulder-health staple. The face pull strengthens the rear delts and mid-back muscles that most people neglect, which helps balance out all your pressing.
- Lead with your elbows on every rep. Driving the elbows high and wide is the cue that puts the work on the rear delts and upper back instead of the lats.
- Pull your hands apart as they come toward you. Spreading the band adds external rotation at the shoulder, which is great for keeping the joint healthy and strong.
- Squeeze your shoulder blades together at the peak. That end-range pinch is where the upper back really works, so hold it for a beat on each rep.
- Use a controlled eccentric. A slow two to three second return keeps your upper back loaded and stops the band from doing the work for you.
- Keep the reps high. This is a muscle that responds to volume and quality contractions, so 15 to 20 reps for 3 to 4 sets works well.
- Program it as a finisher on pull days or after pressing. A few sets at the end of your workout is a smart way to counter all the forward pressing and rounding you do.
- Adjust difficulty by stepping toward or away from the anchor. Moving back increases tension and moving in eases it, so use distance to dial in the right challenge.
- The band version is joint-friendly and easy to set up anywhere. That makes it perfect for home training, warm-ups, or shoulder prehab work.
- Progress with the overload principle by using a thicker band or stepping farther out. When your reps feel easy, add tension to keep forcing adaptation.
- Chase the mind-muscle connection with your rear delts and mid-back. Picture the backs of your shoulders and your blades doing the pulling, since those small muscles are easy to lose track of.
- Keep your shoulders down and away from your ears throughout. This stops the upper traps from stealing the work and keeps the tension where you want it.
- Use it to warm up your shoulders before benching or overhead pressing. A couple of light sets wakes up the rear delts and external rotators for safer heavy lifts.
- Film a set from the side to check your elbow height. The camera shows whether your elbows are staying high or quietly dropping into a row.
- Do not rush to add tension at the cost of form. A clean squeeze with a lighter band beats a jerky pull with a heavy one, so earn the harder band with quality reps.
- Try pausing for two seconds at the top on some sets. The extra hold hammers the contraction and builds better control of your shoulder blades.
- Stay consistent with these long term. Healthy, strong rear delts and upper back muscles protect your shoulders and improve your posture, which pays off in every other lift.








Questions & Comments
Be the first to ask a question about this exercise.