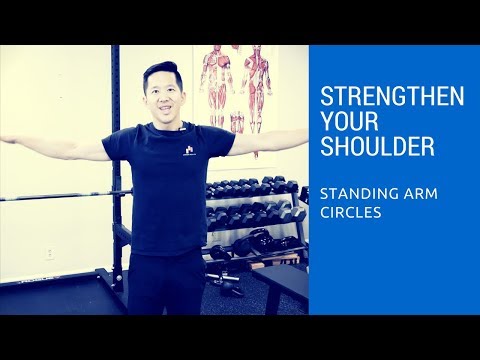
Arm Circles Overview
Arm circles are a simple warm-up move you do standing. They work your shoulders. Your shoulders are the round muscles at the top of your arms. You stand tall and reach your arms straight out to the sides. Then you draw circles in the air with your hands. You circle forward, then backward. You need no equipment at all. Arm circles get your shoulders warm and loose. They send blood to the joint before harder moves. That helps you lift better and stay safe. Arm circles are perfect for beginners. You can do them anywhere with no gear. Use them at the start of an upper-body workout. Start with small circles and grow them as you warm up.
What Is The Point of the Arm Circles?
Arm circles warm up your shoulders and improve blood flow before workouts. This simple movement gets your shoulder joints ready for action and helps prevent injury.
How To Do The Arm Circles
- Stand tall with your feet about shoulder-width apart and your core lightly braced. Good posture here keeps the movement in your shoulders and off your neck.
- Extend both arms straight out to your sides so they are parallel to the floor, forming a T with your body. Keep a slight softness in your elbows.
- Set your shoulders down away from your ears so your traps do not take over. Keep your chest tall throughout.
- Begin making small circles with your arms, moving forward. Keep the movement smooth and controlled rather than flinging your arms.
- Do about 10 to 15 forward circles at this small size, focusing on moving from the shoulder joint. Keep breathing steadily.
- Gradually make the circles a little bigger as your shoulders warm up. Larger circles increase the range as the joint loosens.
- Reverse direction and make backward circles for another 10 to 15 reps. Move through the same small-to-larger progression.
- Keep your arms parallel to the floor and your shoulders down the whole time. Do not let your arms drift or your shoulders shrug.
- Finish when your shoulders feel loose and warm. Use this as a warm-up before upper-body work or as an easy mobility break during the day.
Arm Circles Form Tips
- Stand tall with your chest up. Do not slump forward.
- Keep your arms level with the floor. Do not let them droop.
- Keep your shoulders down and relaxed. Do not shrug them up.
- Move both arms at the same speed. Keep them even.
- Start with small circles. Grow them slowly as you warm up.
- Keep your arms straight but not locked. A soft elbow is fine.
- Breathe in a steady rhythm the whole time.
- Keep your core a little tight. This holds you steady.
- Move smooth and controlled. Do not fling your arms.
Common Mistakes to Avoid for the Arm Circles
- Flinging your arms with momentum. Whipping your arms around fast means the joint barely does any work and you can strain a cold shoulder. Move slowly and control each circle from the shoulder so the muscles actually warm up.
- Shrugging your shoulders up to your ears. Letting your traps hike up takes the movement out of your shoulders and tenses your neck. Set your shoulders down and keep them there through every circle.
- Starting with huge circles right away. Going straight to big, wide circles on a cold joint asks for too much range too soon. Begin small and grow the circles gradually as the shoulder loosens.
- Bending your elbows a lot. Letting your arms collapse and bend shortens the lever and reduces the shoulder work. Keep your arms long with just a soft bend in the elbows.
- Letting your arms drop below parallel. When your arms sag toward the floor, you lose the shoulder position that makes the warm-up effective. Keep your arms level with the floor throughout.
- Holding your breath. Tensing up and holding your breath during any warm-up is counterproductive. Breathe steadily and stay relaxed so the shoulders loosen.
- Only going one direction. Doing forward circles and skipping backward ones warms the shoulder unevenly. Give both directions equal reps to prep the whole joint.
- Rushing to get it over with. Blasting through a few quick circles barely raises the temperature in the joint. Take your time so the warm-up actually does its job.
- Rounding your upper back. Slouching as you circle changes the shoulder angle and stresses your neck. Stand tall with your chest open so the movement stays clean.
- Doing it as your only warm-up before heavy lifting. Arm circles loosen the shoulders but do not fully prepare you for heavy pressing. Follow them with light warm-up sets of your actual lift.
- Overdoing the range on a stiff shoulder. Cranking into a painful range to force mobility can irritate the joint. Work within a comfortable range and let it open up gradually.
Arm Circles Workout Tips
- Use arm circles to warm up the shoulders. They gently raise blood flow and loosen the joint, which makes them a great primer before any upper-body work.
- Start small and build the size. Beginning with tiny circles and growing them as you go respects a cold joint and opens range safely.
- Keep your shoulders down and away from your ears. This keeps the movement in the shoulder joint and off your neck and traps.
- Do both forward and backward circles. Working both directions warms the whole shoulder evenly and preps it for pressing and pulling.
- Move slowly and with control. A deliberate tempo actually warms the joint, while fast flinging does little and can tweak a cold shoulder.
- Keep your arms parallel to the floor. Holding that T position keeps the shoulders in the right spot to loosen up properly.
- Program them at the start of upper-body sessions. A minute of arm circles before you touch a weight helps your shoulders move well under load.
- Use them as a desk break too. A quick set during a long day of sitting loosens stiff shoulders and resets your posture.
- Follow them with movement-specific warm-up sets. Arm circles prime the joint, but light sets of your first lift finish getting you ready for heavy work.
- Breathe steadily and stay relaxed. Keeping loose helps the shoulders open rather than tightening up against the movement.
- Keep a slight bend in your elbows. A soft elbow protects the joint while still keeping your arms long enough to work the shoulder.
- Stand tall with an open chest. Good posture keeps the movement clean and takes strain off your neck.
- Do a few sets throughout the day if your shoulders are tight. They are simple, need no equipment, and add up to better shoulder health over time.
- Keep the range comfortable. Warm-ups should feel good, so work within a pain-free range and let your mobility improve gradually.
- Pair them with band work for a fuller shoulder prep. Adding some band pull-aparts after circles wakes up the rear delts and upper back too.
- Stay consistent with your warm-up. Healthy shoulders come from regularly priming the joint, so make arm circles a habit before you train.








Questions & Comments
Be the first to ask a question about this exercise.