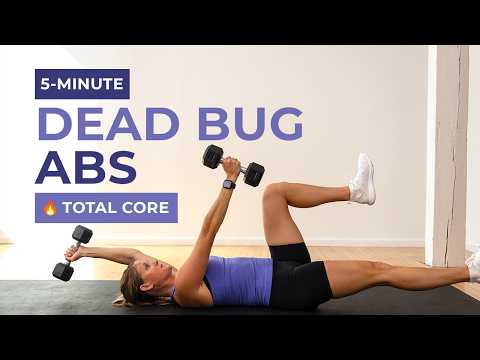
Straight Leg Dead Bug Overview
The straight leg dead bug is a floor core move. You lie on your back and move one arm and the opposite leg. It works your abs, the muscles on the front of your belly. It also works your hip flexors, the muscles on the front of your hips. You need no equipment. You just need floor space. This move teaches your core to stay tight. It keeps your low back safe and flat. The straight leg dead bug is great for beginners. It builds control, not just strength. Use it in a warm-up or a core day. It helps you brace for bigger lifts.
What Is The Point of the Straight Leg Dead Bug?
The straight leg dead bug exercise builds core stability and teaches your abs to stay tight while your limbs move. It's perfect for fixing lower back pain and building a rock-solid foundation.
How To Do The Straight Leg Dead Bug
- Lie flat on your back with your arms reaching straight up toward the ceiling and your legs bent at 90 degrees, knees over hips. This is the classic tabletop start that keeps your core loaded from the first second.
- Press your lower back firmly into the floor and pull your belly button down toward your spine. There should be no gap under your lower back, and keeping it flat is the entire safety and effectiveness of the drill.
- Exhale hard and feel your abs pull tight before you move a limb. This breath drives your ribs down and locks your ribcage to your pelvis, which is the position you must hold the whole time.
- Slowly extend your right arm back overhead while straightening your left leg out and down toward the floor. Move both at the same slow pace, keeping them a few inches above the ground at full reach.
- Keep your lower back glued to the floor the entire time. The moment it starts to arch or your ribs flare up is the moment you have reached your honest range, so do not push past it.
- Pause for about 2 seconds at full extension, feeling your abs fight to keep your spine flat while your opposite limbs reach long. This anti-extension hold is where the real core work happens.
- Slowly return your arm and leg to the tabletop start under control, keeping the same tension and breathing steadily. Do not let anything drop or snap back quickly.
- Switch to your left arm and right leg and repeat with the same slow, deliberate control. Alternate sides each rep, keeping your core braced throughout.
- Aim for 8 to 12 slow reps per side. This is a control and stability drill, so a small, honest range with a flat lower back beats big, sloppy reaching every time.
Straight Leg Dead Bug Form Tips
- Keep your low back pressed flat the whole time.
- Move your arm and leg slow and with control.
- Keep your belly tight like a firm drum.
- Reach your leg long, not just down.
- Stop your leg just above the floor, not on it.
- Breathe out as you reach. Breathe in as you return.
- Keep your other arm and leg still and set.
- Do not let your ribs pop up off the floor.
- Move the arm and opposite leg at the same speed.
Common Mistakes to Avoid for the Straight Leg Dead Bug
- Letting your lower back arch off the floor. This is the number one fault, and it means your hip flexors are pulling your spine into extension instead of your abs holding it flat. Only extend as far as you can while keeping your lower back pressed down, and shorten the range the second it lifts.
- Rushing through the reps. Fast, flailing dead bugs let momentum carry your limbs and skip the exact stability work you are there to build. Slow everything down to a 2 to 3 second reach and a 2 second pause so your core has to control the whole path.
- Holding your breath the whole time. Bracing without breathing turns the drill into a strained clench and you lose the connection between your ribs and pelvis. Exhale as you extend, which naturally pulls your ribs down and helps keep your lower back flat.
- Letting your ribcage flare up. When your ribs pop toward the ceiling, your spine extends and your abs switch off, defeating the purpose of the movement. Keep the front of your ribs pulled down toward your hips so your trunk stays locked in one solid piece.
- Reaching your leg too low too soon. Dropping the straight leg near the floor before you have the strength drags your back into an arch. Keep the leg higher at first and only lower it as your abs prove they can keep the spine flat.
- Moving your arm and leg at different speeds. Letting one limb race ahead breaks the coordinated pattern and usually means you are cheating the harder side. Move the opposite arm and leg together at the same slow tempo so both are honestly controlled.
- Cranking your neck forward. Lifting or straining your head strains your neck and adds nothing to the core work. Keep your head resting down and your neck long, letting your abs do all the stabilizing.
- Bending the working leg to make it easier. Sneaking a knee bend shortens the lever and hides a lack of core control, which defeats the "straight leg" point of the drill. Keep the leg long as it extends, and if it is too hard, reduce the range instead of bending it.
- Only chasing how far the limbs reach. Big range with a lifted back is worse than a small range with a flat back, yet people still stretch for distance. Judge every rep by whether your lower back stayed glued down, not by how far your hand and foot traveled.
- Letting the limbs drop back fast on the return. Slamming your arm and leg back to tabletop wastes the controlled return and lets you rest at the top instead of staying engaged. Bring them back slowly with the same tension you used going out.
- Doing them on a soft surface that hides the arch. A thick, squishy mat lets your back sink in so you cannot feel it lifting. Use a firm surface so you get honest feedback about whether your lower back is truly pressed flat.
- Treating it as an easy warm up and switching off. Because it looks simple, people go through the motions mentally and lose all the tension. Stay focused on the brace, the breath, and the flat back for every single rep to get the real benefit.
Straight Leg Dead Bug Workout Tips
- Master the flat-back brace before you add movement. Spend a few seconds just pressing your lower back into the floor and breathing out hard, because that position is the foundation every rep is built on.
- Exhale as you extend your limbs. A strong breath out drives your ribs down and locks your core, which makes it far easier to keep your lower back flat at full reach.
- Slow the tempo way down. A 2 to 3 second reach out, a short pause, and a 2 to 3 second return turns a simple drill into serious anti-extension core work that carries over to heavy lifts.
- Use it to protect your lower back on big lifts. The dead bug trains your abs to keep your spine stable while your arms and legs move, which is exactly the skill that keeps your back safe under a squat or deadlift.
- Regress the range if your back arches. Keep your leg higher and your arm reaching less far, then slowly extend further over weeks as your core strength catches up to the movement.
- Add a pause at full extension. Holding for two seconds where your abs are working hardest builds strength and control right at the position that usually breaks down first.
- Program it as a warm up or core finisher. It fits perfectly before a lower-body session to switch on your core, or at the end of any workout as low-fatigue stability work.
- Chase the mind-muscle connection in your deep abs. Instead of just moving your limbs, feel your midsection working to keep your ribcage stapled to your pelvis the whole time.
- Keep both limbs a few inches off the floor at full reach. Hovering rather than resting them on the ground keeps constant tension on your core and makes every rep count.
- Progress by lengthening the lever, not adding weight. Straightening the leg fully, lowering it closer to the floor, and slowing the tempo all make this harder without needing any load.
- Match your reps and control on both sides. It is easy to favor your coordinated side, so make sure the weaker, clumsier side gets the same slow, honest reps.
- Film yourself from the side. A quick video instantly shows whether your lower back is lifting off the floor, which is nearly impossible to feel accurately while you are focused on the limbs.
- Try adding a light weight in your hands only once your form is solid. A small dumbbell overhead increases the anti-extension demand, but never add load until you can keep a flat back with bodyweight.
- Use it to build core control for beginners and rehab. Because it is low impact and easy on the spine, it is one of the safest ways to teach a new lifter how to brace properly.
- Keep your neck and jaw relaxed. Straining your head up wastes energy and can give you a stiff neck, so let your head rest down and let your abs do the work.
- Do a set on rest days to reinforce the pattern. This drill barely taxes recovery, so a couple of easy sets on off days keep your bracing skill sharp without cutting into your gains.
- Stay patient and precise. This is a skill exercise more than a burner, so the payoff comes from doing it well and often, not from chasing high rep numbers with sloppy form.








Questions & Comments
Be the first to ask a question about this exercise.