Reverse Crunch to Dead Bug Overview
The reverse crunch to dead bug builds your abs. The abs are the muscles on the front of your belly. Your hip flexors help too. The hip flexors are the muscles at the top of your thighs. You lie on your back. You do a reverse crunch, then flow into a dead bug. You need no equipment for this move. The reverse crunch to dead bug works your abs two ways. The crunch curls your hips up. The dead bug teaches your core to stay steady. Together they build strong, useful abs. This move suits intermediate lifters. It fits well in a core routine. You can do it at home on a mat.
What Is The Point of the Reverse Crunch to Dead Bug?
The reverse crunch to dead bug exercise builds core strength while training stability. It targets your abs and hip flexors for better movement control.
How To Do The Reverse Crunch to Dead Bug
- Lie on your back with your knees bent at 90 degrees and your arms reaching straight up toward the ceiling. Press your lower back gently into the floor and brace your core.
- Begin the reverse crunch by drawing your knees toward your chest, curling your pelvis up so your hips lift slightly off the ground. The movement comes from your abs rolling your pelvis, not from swinging your legs.
- Squeeze your abs at the top of the reverse crunch, then lower your hips back down to the floor with control. Keep your core engaged so your lower back does not slam down.
- Return to the starting position with knees bent at 90 degrees and arms up. This resets you for the dead bug half of the sequence.
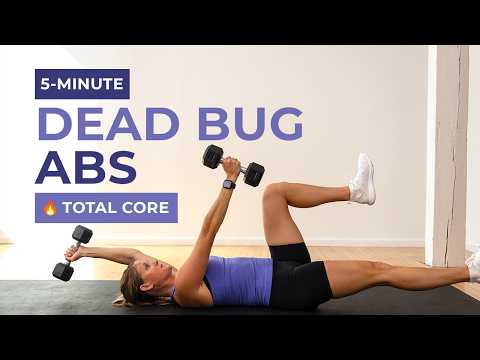
- Transition into the dead bug by slowly lowering your right arm back overhead while extending your left leg straight out. Move both limbs at the same steady pace.
- Reach your arm and leg out until they hover just above the floor, keeping your lower back pressed down the whole time. This anti-extension hold is the core of the dead bug.
- Bring your arm and leg back to the start under control, then repeat the dead bug on the opposite side with the left arm and right leg.
- Continue alternating the full reverse crunch to dead bug sequence, keeping every movement slow and controlled. Aim for 8 to 12 full rounds for 3 to 4 sets.
Reverse Crunch to Dead Bug Form Tips
- Keep your lower back pressed into the floor.
- Keep your core tight the whole time.
- Move slowly through both parts.
- Curl your hips up in the reverse crunch, not just swing your legs.
- In the dead bug, move your arm and leg slowly.
- Keep your extended leg low but off the floor.
- Breathe out as you crunch. Breathe out as you extend.
- Keep your head and neck relaxed on the floor.
- Move the opposite arm and leg together.
- Keep the whole flow smooth and steady.
Common Mistakes to Avoid for the Reverse Crunch to Dead Bug
- Swinging the legs on the reverse crunch. Using momentum to throw your knees toward your chest takes the abs out of it and turns the move into a hip swing. Curl your pelvis up slowly with your abs so the crunch comes from your core, not a leg swing.
- Letting the lower back arch during the dead bug. When you extend your arm and leg, a weak core lets your lower back lift into an arch that strains your spine. Press your lower back firmly into the floor and only extend as far as you can hold it there.
- Extending the dead bug limbs too fast or too far. Reaching out quickly or all the way to the floor beyond your control makes your back arch and your core lose tension. Move slowly and stop where you can keep your spine flat.
- Rushing the whole sequence. Flying through the reverse crunch and dead bug uses momentum and skips the control that makes both moves valuable. Slow every phase down so your abs stay in charge throughout.
- Holding your breath. Bracing so hard you stop breathing defeats the point of learning to keep your core stable while breathing normally. Keep a steady breathing rhythm through the whole sequence.
- Yanking the neck up. Craning your head off the floor to help the crunch strains your neck and does nothing for your abs. Keep your head relaxed and your neck long.
- Losing the pelvic curl on the reverse crunch. Just lifting bent legs without rolling your pelvis misses the lower-ab contraction that makes the reverse crunch work. Focus on curling your hips up off the floor, not just raising your knees.
- Moving the arm and leg at different speeds. Letting one limb race ahead of the other breaks the coordinated anti-extension challenge of the dead bug. Move your opposite arm and leg together at the same steady pace.
- Dropping the hips down hard after the crunch. Letting your pelvis crash back to the floor wastes the eccentric and can jar your back. Lower under control with your abs still engaged.
- Doing it with a soft, unbraced core. Starting either movement without a firm brace lets your back arch and your hip flexors dominate. Set your core brace and keep it the whole time.
- Going too fast to chase reps. Piling up sloppy rounds builds far less than a handful of slow, controlled ones. Prioritize quality and control over the rep count.
Reverse Crunch to Dead Bug Workout Tips
- Curl your pelvis on the reverse crunch. The lower-ab work comes from rolling your hips up off the floor, not from swinging your knees, so focus on that pelvic tilt.
- Keep your lower back pressed down in the dead bug. Fighting to keep your spine flat as your limbs extend is the whole anti-extension challenge, and it builds deep core control.
- Move slowly through both halves. Control is everything here, so take your time on the reverse crunch and the dead bug alike.
- Only extend as far as you can stay flat. In the dead bug, reach your arm and leg out to the edge of your control, then bring them back before your back arches.
- Breathe steadily throughout. Learning to keep your core braced while breathing normally is a big part of why this combo builds usable stability.
- Move opposite arm and leg together in the dead bug. Coordinating them at the same pace trains the cross-body control that carries over to real movement.
- Use it as a complete core sequence. Pairing the reverse crunch with the dead bug hits the lower abs and deep stabilizers in one flowing set, which is efficient and effective.
- Keep your neck and shoulders relaxed. Letting your head rest on the floor keeps the tension in your abs, not your neck.
- Progress by slowing down or adding a pause. Since it is bodyweight, you overload by moving slower, pausing at the hardest point, or adding light ankle weights.
- Program it on core days or as a warm-up. It is a great low-risk way to fire up your core and groove good spinal control before heavier lifting.
- Keep a steady, controlled tempo on the reverse crunch. Lowering your hips slowly keeps tension on the abs and protects your back.
- Set your core brace before you start. A firm midsection from the first rep keeps your hip flexors from taking over and your back from arching.
- Do it on a mat for comfort. Padding under your spine lets you focus on control instead of a hard floor.
- Value quality over quantity. A handful of slow, rock-solid rounds builds more real core strength than twenty rushed ones.
- Match your reps evenly side to side. Alternating limbs and doing equal work keeps your core balanced left and right.
- Use it to protect your lower back. The anti-extension control you build here directly supports safer squats, deadlifts, and overhead pressing.








Questions & Comments
Be the first to ask a question about this exercise.